122 | Bronchoscopy doesn't need to be scary - here's exactly how to approach it as a vet nurse
Lower airway endoscopy, aka tracheobronchoscopy or just bronchoscopy for short, is - if I’m honest - the procedure I find the scariest in practice.
And to me, that’s probably the biggest reason why I think our role in it as veterinary nurses and technicians is underrated.
There’s one case that will forever stick with me - an oxygen-dependent cat who needed a lower airway scope for a suspected airway mass. She’d been stabilised as much as possible prior to the investigations, and we knew they’d be high risk. Despite preparing for them as much as possible, she still desaturated down to 22% - yes, 22%, the lowest I’ve ever seen an SpO2 in an alive patient - and became peri-arrest.
Prompt action from our team meant we prevented this patient from arresting, and after quick intervention her SpO2 increased again. But it goes to show how quickly things can change for these patients, and how preparation and communication from the nursing team can make an enormous difference.
And that’s exactly what we’re covering today. My goal with this episode is that you leave it feeling completely confident with bronchoscopy cases - both from an anaesthetic support point of view, and when handling and assisting with the scopes themselves. We’ll cover the indications for these procedures, the ins and outs of the scopes we use, how to collect samples from the lower airway, and a few hints and tips to run these cases successfully as a vet nurse - because we really can have a central role in managing them.
Let’s get into it.
Firstly, what’s involved in a canine or feline bronchoscopy?
I want to start by talking about what the procedure actually is, and then we’ll get into things like the scopes themselves, how we collect samples, and of course our role as nurses and technicians.
Of course, every patient will be different and there will be some areas of the lower respiratory tract that are more important for certain patients - for example if we’re worried about laryngeal function only, we may not need to go down into the lungs themselves.
Tracheobronchoscopy is the umbrella term for looking at the trachea and the bronchial tree, and in practice it’s almost always accompanied by a laryngeal exam - because we want to look at the entrance to the lower airways, especially if we’re concerned about laryngeal function.
This means that, in most cases, laryngoscopy, tracheoscopy and bronchoscopy usually happen as one continuous procedure under a single anaesthetic.
It is a team procedure, and I really want to highlight that because when I worked in GP I didn’t appreciate how important my role was.
Back then, I thought it was just to hold the head up, extubate as needed, and monitor the patient while the vet did the scope.
But years of working with these patients and seeing what happens when they go well - and when they don’t - has shown me just how important our role is.
These patients are not undergoing investigations for fun. They’ve got pre-existing airway or respiratory disease, because otherwise they wouldn’t need the procedure. And this means we can’t predict how they’ll respond to anaesthetic drugs, to the scope itself, and to the issues we can run into with airway access and oxygen delivery during the procedure (which we’ll come onto in a second).
We need to make the entire procedure as efficient as we can and keep anaesthesia time as short as possible - and that means our role is absolutely vital.
So, how is a bronchoscopy performed?
The larynx is assessed first - this is usually performed at induction with a laryngoscope, under a very light plane of anaesthesia, because the drugs we use can easily depress laryngeal movement.
Once the clinician is happy with the larynx, the patient is induced, stabilised, and positioned in sternal recumbency with the head and neck extended. This straightens the trachea and makes passing the scope much easier.
When safe to do so, the scope is passed down through the larynx into the trachea, and the trachea is examined all the way down to the carina, which is the point where it splits into the left and right mainstem bronchi - the bronchi supplying each lung.
From there the clinician systematically examines one lung and then the other, passing the scope through lobar bronchi and then the smaller bronchioles.
While doing this, they’re checking each segmental airway for changes in colour, shape and size, and for any signs of bubbling, mucus, purulent discharge, foreign material and other abnormalities.
Following that same order every time is what stops airways being missed. The right mainstem bronchus sits pretty much straight ahead of the scope, whereas the left takes a bit of manoeuvring to get into, and that's exactly why inhaled foreign bodies - grass blades especially - tend to lodge on the right.
If the clinician loses their bearings at any point, they pull back to the carina to reorientate themselves.
It’s really helpful to have a diagram of the lungs near your scope tower to help with visualisation - I’ve included one here for you, so feel free to print and laminate this for your own clinic.
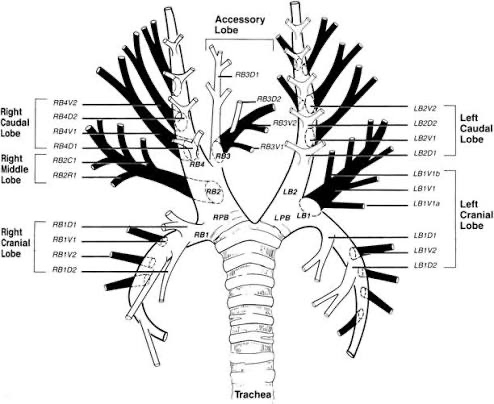
Source: Creevy, 2009.
After examining the airways, they’ll obtain samples.
This is typically achieved using a bronchoalveolar lavage or BAL - and it’s good practice to do this even if the airways look ‘normal’ visually, because inflammation in the airway is not always obvious.
BALs can be performed blindly in patients with diffuse disease where bronchoscopy is not needed, or guided, via the endoscope.
During a BAL, sterile saline is aseptically instilled into the airways either via the endoscope channel, or via an aspiration catheter. Coupage is performed, while either manual aspiration or a suction unit is used to retrieve the fluid. The idea is that cells, bacteria and other pathogens enter the fluid, which is then analysed for cytology, culture and infectious disease testing as required.
We typically instill around 0.5-1ml/kg of saline, up to 2-3 times depending on the individual patient, volumes retrieved, and appearance of the fluid. We won’t get all of the fluid back, and usually this does not cause too much of a problem because we don’t instill huge volumes, and the lungs absorb any residual fluid easily.
A good-quality sample is frothy (this indicates we’ve got surfactant in the sample, and surfactant is the substance that lines the alveoli - so we’ve washed the lungs), and often cloudy. The sample is transferred to plain and EDTA tubes, and smears made as necessary.
One quick point to mention from a nursing perspective is the risk of contamination here, especially if you’re using suction through your endoscope to collect your BAL sample.
Any contamination of your scope can impact your culture result - so it’s good practice to collect a pre-culture flush sample of your scope channel by running some saline through it.
That way, if your culture comes back with a weird result and the vet wants to double-check it, you can submit that fluid for analysis and check if it was a contaminant.
Other sampling techniques are also used occasionally, but less often compared with BAL. These include cytology brush sampling - where a sterile brush is introduced through the instrument channel and scraped across the airway mucosa - and (very rarely) tissue biopsies.
Airway access during small animal tracheobronchoscopy
One challenge unique to bronchoscopy is airway access.
Firstly, if we need to visualise the trachea, we can’t do this fully with an ET tube in place - this usually means that, if our patient is intubated, we extubate them while we examine the trachea, then re-intubate them to continue the procedure.
Additionally, depending on the size of your patient, intubation may actually not be possible - because most bronchoscopes are around 3-4mm in diameter, they’d occlude too much of the ET tube. This is especially true for cats and small dogs (basically any patient with a size 5 ET tube or smaller), meaning they need to be extubated for the entire procedure.
This means that the whole procedure happens in short bursts with careful monitoring and time for re-oxygenation in between. The clinician looks for a little while, then comes out to let the patient recover their oxygen levels, then goes back in - which is another reason why our role in patient monitoring and communication is so important. Once the airways have been fully examined, samples are collected, and then the patient is recovered.
What scopes do we use, and what do we need to know about them?
Tracheobronchoscopy is performed using a flexible bronchoscope. This is similar to a GI scope, but a simpler scope with less features - since we don’t require things like air or water instillation, or four-way movement with respiratory endoscopy.
Like our GI scope as we discussed in episode 121, our bronchoscope has a main body or handpiece, and then an insertion tube. The distal end of the insertion tube can be bent up and down with an angulation lever on the handpiece, letting the clinician manouver the scope through the airways.
Bronchoscopes are usually around 3-4mm in diameter, with a 1-2mm channel. They require much smaller channel instruments than our GI scopes, and are also much shorter - with a working length of usually around 50-60cm. In small dogs and cats, that’s not an issue, but with our larger dogs, we may find the scopes are too short to assess the airways thoroughly. If that’s the case, longer bronchoscopes (or a small gastroscope) are usually required.
There is an instrument/suction channel on the body of the scope, where instruments can be introduced or fluid can be instilled for sampling. And most bronchoscopes have a suction button on the handpiece, too - this allows fluid to be suctioned through the endoscope channel into a collection device. Inside the scope, the instrument and suction channels join together to make one large channel - so if you’ve got an instrument inside your channel and then you try to suction, it won’t be as effective.
You can also use this channel to administer oxygen in some cases. I do just want to caveat this with a bit of a warning, though - if you’re in a really narrow airway and your scope is blocking almost the entire bronchiole, any oxygen being administered can’t escape. This means we can be continually pumping oxygen into small and very specific parts of the airways, risking barotrauma while not giving our patients a huge amount of benefit.
Alongside the scope itself, there’s lots of ancillary kit we need.
This includes aspiration catheters for instilling or suctioning fluid, grasping forceps to remove airway foreign bodies, and biopsy forceps and cytology brushes. We also use mucous traps, which are sterile in-line suction traps that collect BAL fluid.
Just like we discussed in last week’s episode, making sure all of that ancillary kit is damage-free, functioning properly and unlikely to cause damage to the inside of the scope is vital.
And because time is of the essence with bronchoscopy, we need to make sure the scope, and all the equipment, is prepared and checked in advance of anaesthetising the patient.
So that’s what a bronchoscopy is, but when is one indicated?
Like GI endoscopy, a bronchoscopy is usually performed later in the diagnostic process rather than at the start.
Beforehand, these patients have typically had a full history and clinical exam, including how they've responded to any previous treatment such as antibiotics, wormers or bronchodilators, along with bloods, infectious disease testing where needed, and thoracic radiographs (or CT).
The imaging is important because it helps look for extra-airway disease that could be causing respiratory signs - for example pleural space disease, or mediastinal masses that could be compressing the airway. So we always want to start with imaging, and then move on to endoscopy where it is required.
I’ve also mentioned that a laryngeal exam should be performed in any cat or dog anaesthetised for a respiratory procedure, even if we’re not highly suspicious of laryngeal abnormalities.
The reason is that hyperaemia, secretions and oedema around the larynx are commonly found alongside lower airway disease and can contribute to the clinical signs.
On top of this, it isn’t always easy to differentiate between a laryngeal problem and lower airway disease from the history alone, especially in cats. In fact, we had one case a while back where we suspected asthma, but found laryngeal paralysis secondary to mycoplasma infection - the cat ended up needing an emergency tracheostomy, but made a full recovery after the mycoplasma was treated. Not a common occurrence, but sometimes these patients can throw us curveballs, so we need to be prepared for any eventuality.
Laryngoscopy is the visual examination of the laryngeal anatomy and its movement, and it's all about assessing function. It’s indicated in patients with upper airway noise like stridor, vocal changes or dysphonia, increased inspiratory effort or exercise intolerance. The big thing we're trying to confirm or rule out in dogs is laryngeal paralysis, where one or both arytenoid cartilages fail to abduct properly on inspiration. In cats, the most common laryngeal abnormality we see is oedema, with tumours and paralysis seen less frequently.
Moving down into the lower airways, the classic indications for bronchoscopy are chronic or acute coughing that either has no obvious cause or hasn't responded to standard treatment, haemoptysis, unexplained changes on chest radiographs, and suspected airway foreign bodies.
It's also really useful for patients with suspected tracheal collapse, because the scope shows us the severity and the dynamic nature of the collapse as the patient breathes - something we can’t get from x-rays.
Where bronchoscopy is less useful is in interstitial lung disease and in respiratory neoplasia, because these conditions don't always shed cells into the airways - meaning we can’t reach them with things like bronchoalveolar lavage or cytology brushing.
When should a bronchoscopy be avoided - which patients isn’t it safe in?
A big part of keeping patients safe during bronchoscopy is knowing when we should and shouldn’t attempt it.
Bronchoscopy should be avoided in animals with severe obstructive airway disease that can't be stabilised, severe lung (parenchymal) disease, or unexplained compromise of their ventilation or perfusion, along with any patient who isn't a safe anaesthetic candidate.
As I mentioned, many of these patients have respiratory compromise - and we need to balance our need for answers to guide treatment with the risks getting those answers will pose to our patient.
If our patient is oxygen-dependent and can’t get off of oxygen, bronchoscopy automatically becomes more risky, and should only be performed where absolutely necessary (eg if they won’t improve without answers from the procedure).
This is why proper case selection, and stabilising the patient first by getting them settled in oxygen and reducing stress before we even think about induction, is such a big part of the procedure - and one of the areas where we are so important.
So what does our role look like as veterinary nurses - how do we support patients during bronchoscopy?
I’ve already mentioned a lot that we are really central to this entire procedure, and I’m not underestimating when I say this.
Yes, a bronchoscopy is technically challenging - but the really hard bit is often keeping a patient with respiratory disease safely anaesthetised while we partially block their airway with a scope and then introduce fluid into their lungs.
And this means every aspect of our role - from planning and pre-procedure setup, to anaesthetic support, to recovery - is vitally important.
Anaesthesia protocols are developed based on the individual patient, avoiding drugs that cause respiratory depression. We will often administer bronchodilators such as terbutaline prior to the procedure - ideally not IV, as this causes quite significant tachycardia.
We typically perform TIVA for maintenance in these patients, allowing us to reliably anaesthetise them in the absence of an ET tube (while avoiding environmental contamination with volatile agent).
Preparation and preoxygenation
I’ve already mentioned that preparing everything in advance to minimise anaesthetic time is vital. This becomes even more important in oxygen-dependent patients, where we want to avoid time outside of oxygen as much as possible.
In these cases, we don’t want to move the patient for induction until everything is ready to go and the clinician/team are present and ready to start. Portable oxygen may be needed during the move too, depending on the size of your hospital.
Monitoring for desaturation and the importance of SpO2
The procedure does not begin until you’re happy with the anaesthetic and you’ve got a reliable SpO2. And if the SpO2 probe comes off or stops reading at all during the procedure, it’s repositioned as a priority because we can’t tell if that patient has desaturated or not. If that means the clinician needs to stop for a second while we reposition it, then that’s what happens.
I personally also like to agree a cut-off SpO2 value before the procedure begins. This can be really helpful, because it gives a clear ‘stop’ point to the team. For example, you and the vet may agree that for this particular patient, you’ll immediately stop, remove the scope and intubate the patient if they reach 92%.
Throughout the entire anaesthetic, we’re communicating constantly about how the patient is doing so the clinician knows how much time they've got before they need to pull the scope out and let them recover.
Airway access and emergency planning
Because we can’t perform the majority of bronchoscopies intubated, we need to consider other ways of administering oxygen to these patients.
One way is to use a rigid urinary catheter to administer tracheal oxygen alongside the endoscope.
The catheter is introduced in the same way as an ET tube (taking care not to advance it too far, where it could enter a bronchus and only oxygenate one lung) - and attached to an ET tube connector and circuit.
In larger patients, an elbow connector with an endoscopy port can be used on the end of the ET tube. This allows us to pass the endoscope through the middle of the ET tube, meaning we can keep reliably delivering oxygen throughout the procedure. The connector does increase dead space, so this is something to monitor - but it usually isn’t too much of a problem.
I also like to keep a variety of ET tube sizes, ties, and masks on hand to allow rapid re-intubation if needed during the procedure or on recovery. And alongside this, I keep large cotton buds and suction (if available) on hand to clear any respiratory secretions - especially from around the larynx at the end of the procedure as the patient recovers.
Patient positioning and sampling
We want to position the patient in sternal recumbency, with the neck extended to elongate the trachea and make the procedure easy - and therefore quicker - for the clinician.
A gag (or a cut-down needle cap for cats, because we don’t use spring-loaded gags in cats) is used to protect the scope from bite damage, and this needs to stay in place at all times.
During the BAL we're often the ones applying coupage to the chest to help mobilise the sample, and then handling suction to retrieve it. And afterwards, the sample handling and submission are our responsibility, too.
Recovery and post-procedure care
After the procedure, the patient should be re-intubated and kept on 100% oxygen until they're stable, then recovered somewhere quiet with as little stimulation as possible.
They should be monitored closely for several hours, with supplemental oxygen by flow-by or an oxygen tent if needed.
Auscultation of the chest may reveal crackles at the BAL site for a few hours afterwards - if you hear this, but the patient is otherwise OK, it’s not usually a concern. What we do want to watch out for, though, are changes in respiratory rate, pattern, effort or desaturation.
In cats, particularly, bronchospasm in recovery is an important consideration to look out for - and that’s why I like to keep an emergency airway tray with them as they recover.
Upper airway obstruction can also occur, due to things like laryngeal oedema, swelling after a biopsy or from a pre-existing lesion, a build-up of secretions, or bronchoconstriction.
If airway swelling is a risk, dexamethasone is often administered, and terubtaline may be repeated in some cases if bronchoconstriction is a concern. In all cases, I pre-calculate doses of these, and have the drugs within easy reach in case of complications - because hopefully that means I won’t need it, but if I do, it’s right there.
None of this is us acting outside of the legal scope of our role. We’re not administering medications, we’re getting doses from the vet so we’re prepared in case emergency intervention is needed.
Knowing what to look out for in these patients allows us to ensure their safety and adapt our nursing care - all while using more of our skills in the process.
So, there you have it. Lower airway endoscopy, and how we manage it as veterinary nurses.
This was a long one, so before we wrap up the episode, I just want to give you a quick summary of what we’ve discussed - so you leave with the most important bits front-of-mind.
Bronchoscopy is commonly used to investigate coughing, abnormal respiratory pattern or noise, haemoptysis, foreign bodies, tracheal collapse and unexplained changes on imaging. Because of this, our patients will have some degree of respiratory compromise, and even stable patients can decompensate - so preparation, anaesthesia support and stabilisation are vital nursing considerations.
The whole procedure involves examination of the larynx, trachea, bronchi and bronchioles, systematically across both lungs, with sample collection as needed. It’s usually performed in short bursts with reoxygenation time, depending on the individual patient.
It’s performed using a flexible bronchoscope, with many of the same handling, care, and use considerations as the GI scope as we discussed last week.
These patients really need us for the procedure to be successful. We stabilise them beforehand, pre-oxygenate them, work with our vets to collaborate on anaesthesia protocols, protect the airway and the scope, keep them oxygenated by whatever route suits their size, watch their saturation constantly, apply coupage, handle the samples, and continue that care in recovery.
And all of this means that there are many more ways to nurse these patients than ‘just’ setting up the scope and monitoring the GA - with lots of skills we can use in the process.
Did you enjoy this episode? If so, I’d love to hear what you think. Take a screenshot and tag me on Instagram (@vetinternalmedicinenursing) so I can give you a shout-out and share it with a colleague who’d find it helpful!
Thanks for learning with me this week, and I’ll see you next time!
References and Further Reading
Cox, S. (2009) Overview of small animal respiratory endoscopy (Proceedings). DVM360, available at: https://www.dvm360.com/view/overview-small-animal-respiratory-endoscopy-proceedings
Creevy K. E. (2009). Airway evaluation and flexible endoscopic procedures in dogs and cats: laryngoscopy, transtracheal wash, tracheobronchoscopy, and bronchoalveolar lavage. Veterinary clinics of North America. Small animal practice, 39(5), 869–880. https://doi.org/10.1016/j.cvsm.2009.05.001
Dear, J. D., & Johnson, L. R. (2013). Lower respiratory tract endoscopy in the cat: diagnostic approach to bronchial disease. Journal of feline medicine and surgery, 15(11), 1019–1027. https://doi.org/10.1177/1098612X13508253
Padrid, P.A. (undated). Laryngoscopy and Tracheobronchoscopy of the Dog and Cat. Veterian Key, available at: https://veteriankey.com/laryngoscopy-and-tracheobronchoscopy-of-the-dog-and-cat/
Robertson, E. (2018) Feline Tracheobronchoscopy: Why, When, What and How? WSAVA Congress Proceedings 2018. VIN, available at: https://www.vin.com/doc/?id=8896791
Tappin, S. (2010) Bronchoscopy: approaches to evaluation and sampling. Vet Times, available at: https://www.vettimes.co.uk
Ybarra, W. L., Johnson, L. R., Drazenovich, T. L., Johnson, E. G., & Vernau, W. (2012). Interpretation of multisegment bronchoalveolar lavage in cats (1/2001-1/2011). Journal of veterinary internal medicine, 26(6), 1281–1287. https://doi.org/10.1111/j.1939-1676.2012.01016.x